Concours Headlight Adjuster by Harry Martin
Introduction
Note: The small images are links to very large files.
 I recently purchased a new headlight bulb for my '86 Concours, "The
Shadow", as a backup in case my headlight died while out on a long trip.
I decided to install the new bulb and use the old one as the spare. After
installation, I noticed that the beam was a tad off from where I wanted
it to point. Now I had to figure out how to adjust something I've never
done before. Where is it and how do I do it? After checking the big
"K" manual, I found it on the lower left side of the bulb socket.
A little round thingy with three holes in a triangular pattern. The owners
manual describes how to use a phillips screwdriver to make this vertical
adjustment. Not so easy...well, for me anyway. It took four screwdrivers
before I found one that fits in the hole and mates properly with the teeth
on the adjuster. The first time I tried to do this, I chewed up some plastic
and popped loose the metal bracket that straddles the slot.
I recently purchased a new headlight bulb for my '86 Concours, "The
Shadow", as a backup in case my headlight died while out on a long trip.
I decided to install the new bulb and use the old one as the spare. After
installation, I noticed that the beam was a tad off from where I wanted
it to point. Now I had to figure out how to adjust something I've never
done before. Where is it and how do I do it? After checking the big
"K" manual, I found it on the lower left side of the bulb socket.
A little round thingy with three holes in a triangular pattern. The owners
manual describes how to use a phillips screwdriver to make this vertical
adjustment. Not so easy...well, for me anyway. It took four screwdrivers
before I found one that fits in the hole and mates properly with the teeth
on the adjuster. The first time I tried to do this, I chewed up some plastic
and popped loose the metal bracket that straddles the slot.
You will want to CAREFULLY read this entire write up before attempting
this project on your own.
The Idea
 Looking at the adjuster, it seemed logical to me that it would be easier to use
a tool that mated up with them three holes. So I found a one half inch
diameter dowel and "duck taped" three finishing nails in a triangular pattern.
So far, so good. I rotated the steering to the right, reached in and inserted
the tool. A little twist and I was in business. However, this doesn't help
when I'm riding the bike and the bags are stuffed to full rated capacity.
Looking at the adjuster, it seemed logical to me that it would be easier to use
a tool that mated up with them three holes. So I found a one half inch
diameter dowel and "duck taped" three finishing nails in a triangular pattern.
So far, so good. I rotated the steering to the right, reached in and inserted
the tool. A little twist and I was in business. However, this doesn't help
when I'm riding the bike and the bags are stuffed to full rated capacity.
The Tool
Well, this is great. Now if I can just get the new tool to stay there
and get an extension on it for when I'm underway, then I could burn out
the eyes of offensive cage drivers. I would need some kind of adapter that
would grab them holes and connect to a flexible extension and then add
a knob. That's it! Well, looks easy on paper as you can see in my scrap
printer paper idea. 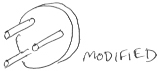 In
reality, tapping those holes for threads or attaching a spring loaded prong,
and a few dozen ideas later, just didn't cut the mustard. I wanted something
easy to install and easy to duplicate. I just have hacksaws and hand drills
to work with. I don't have a machine shop.
In
reality, tapping those holes for threads or attaching a spring loaded prong,
and a few dozen ideas later, just didn't cut the mustard. I wanted something
easy to install and easy to duplicate. I just have hacksaws and hand drills
to work with. I don't have a machine shop.
The Extension
Rummaging around my garage, I found a few things I thought might work.
My first choice was a flexible grabber tool that you can use to fish objects
off the floor or maybe (if you are lucky) from the bowels of the Connie
fairing. That was too stiff and springy. 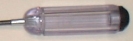 No
good. Next, I grabbed a carburetor adjuster tool I bought two years ago
to make adjustments on my car. I believe it was for GM cars, but when I
got home to try it out, it wouldn't work on any of my carbs. It was sitting
in my tool box all this time. Oh well, let's try it out for size. Hey,
the length is about right and the flex is about right, but how do you get
it to attach to the tool? Oh well, I'll work that out later. In the mean
time, let's cut the handle off as it is too long. Hey!...I'm left with
a pretty good knob. It's looking better already.
No
good. Next, I grabbed a carburetor adjuster tool I bought two years ago
to make adjustments on my car. I believe it was for GM cars, but when I
got home to try it out, it wouldn't work on any of my carbs. It was sitting
in my tool box all this time. Oh well, let's try it out for size. Hey,
the length is about right and the flex is about right, but how do you get
it to attach to the tool? Oh well, I'll work that out later. In the mean
time, let's cut the handle off as it is too long. Hey!...I'm left with
a pretty good knob. It's looking better already.
The Adapter
 A
three prong adapter was my next thought. The carb adjust tool has a magnetic
hex bit socket that has a pretty good grip. Now if I can just get a hex
bit to attach to the three prong tool, I'd be in business. One idea was
to use a pile of nuts stacked on a bolt. But after a couple of tries, torque
would loosen the nuts. After several more brain storm sessions, countless
trips to the hardware store, and a few more broken drill bits, I came up
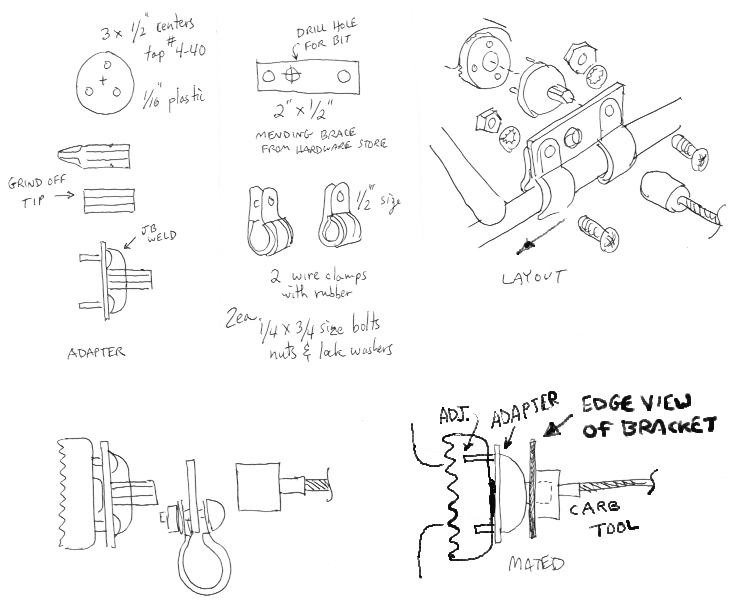
with a pretty good solution. The adapter is made from a #2 drywall screw
driver hex bit ground down to about a half inch in length. It is then super
glued to a 1/16" round piece of plastic that has three holes spaced 1/2"
apart in a triangular pattern. I tapped the three holes for #4-40 screws,
about 1/4" in length. The hex bit is then secured in place with JB Weld
epoxy to make it as rigid as possible. Cool.
A
three prong adapter was my next thought. The carb adjust tool has a magnetic
hex bit socket that has a pretty good grip. Now if I can just get a hex
bit to attach to the three prong tool, I'd be in business. One idea was
to use a pile of nuts stacked on a bolt. But after a couple of tries, torque
would loosen the nuts. After several more brain storm sessions, countless
trips to the hardware store, and a few more broken drill bits, I came up
with a pretty good solution. The adapter is made from a #2 drywall screw
driver hex bit ground down to about a half inch in length. It is then super
glued to a 1/16" round piece of plastic that has three holes spaced 1/2"
apart in a triangular pattern. I tapped the three holes for #4-40 screws,
about 1/4" in length. The hex bit is then secured in place with JB Weld
epoxy to make it as rigid as possible. Cool.  The
flex extension holds the adapter with a magnetic grip making it easy for
quick installation or removal. Testing, by holding the adapter in place
with my hand, confirmed that the flex tool will turn the adapter mated
to the adjuster. The flex had all the right properties to do the twist
without binding or losing its shape.
The
flex extension holds the adapter with a magnetic grip making it easy for
quick installation or removal. Testing, by holding the adapter in place
with my hand, confirmed that the flex tool will turn the adapter mated
to the adjuster. The flex had all the right properties to do the twist
without binding or losing its shape.
Bringing it all together
The last problem is how to keep the adapter mated to the headlight
adjuster. There just seemed to be no easy way. I thought about this for
a long time. I figured there had to be a simple way, like using my own
hand, to keep the adapter in place. I didn't want to have to do anything
extraordinary to achieve this as there is just not enough room to get big
hands inside the frame to do much work. 
I thought of all kinds of fancy brackets, but after another week of
brainstorming, I came up with a bracket that simply straps to the frame,
and holds the adapter in place, just like my hand. PERFECT! This bracket
is off the shelf 1/2" X 2" X 1/16" rectangle with two holes at either end.
I drilled a hole off center and to the left, up just a tad for the adapter. 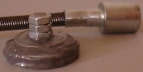 I
purchased two 1/2" sized rubber insulated electrical clamps that grab the
Connie frame a little too tight, but still have enough adjustment. I suppose
3/8" clamps would be better, but the 1/2" ones work fine. They are held
in place using 1/4 size bolts, lock washers, and nuts. Note that the left
clamp must be positioned as far to the left as you can get it against the
diagonal portion of the frame that meets the horizontal frame piece. The
drilled hole must be large enough to accept the hex bit and allow for an
easy twist when you rotate the knob. The hole must be located so that the
adapter does not bind when twisted. I did not make any measurements here,
I just did some dead reckoning, so I don't have any accurate measurements
for this write up. I just went for it and used a metal reaming tool to
make the hole bigger as needed. With three remaining brackets from the
package, I wasn't worried about accuracy. I was lucky that my calibrated
eye got it right on the first try.
I
purchased two 1/2" sized rubber insulated electrical clamps that grab the
Connie frame a little too tight, but still have enough adjustment. I suppose
3/8" clamps would be better, but the 1/2" ones work fine. They are held
in place using 1/4 size bolts, lock washers, and nuts. Note that the left
clamp must be positioned as far to the left as you can get it against the
diagonal portion of the frame that meets the horizontal frame piece. The
drilled hole must be large enough to accept the hex bit and allow for an
easy twist when you rotate the knob. The hole must be located so that the
adapter does not bind when twisted. I did not make any measurements here,
I just did some dead reckoning, so I don't have any accurate measurements
for this write up. I just went for it and used a metal reaming tool to
make the hole bigger as needed. With three remaining brackets from the
package, I wasn't worried about accuracy. I was lucky that my calibrated
eye got it right on the first try. 
One minor problem must be noted before you get started. The hex bit
that I ground down must not be too long or too short. Mine is about 1/2"
to 9/16" in length. The important thing to keep in mind is that the length
of the bit must be such that it completely fills the hex socket on the
flex extension, allow for the thickness of the bracket, and provide enough
grip for the epoxy holding it in position to the plastic part of the adapter.
The bracket is mounted parallel to the horizontal portion of the frame,
and perpendicular as viewed from its edge. I had to file away some excess
epoxy as I discovered that I lacked enough hex bit to feed through the
bracket and mate to the magnetic socket.
Lastly, the flex carb tool with the hacked handle, is routed straight
back and held to my handle bars using a tie wrap. The tie wrap is not tight.
Just loose enough to allow the hex socket to slip through. The knob just
rests against my handle bar but it does stay in position. Should the hex
socket become detached, it merely falls straight down out of harms way.
I suppose I could glue the bit to the socket with some contact cement,
but so far, it is staying in place. 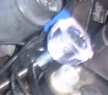
The result is very satisfying. I can make headlight adjustments while
on a night mission. During the day, I can easily remove the tool and tuck
it away. I can easily install the tool for the next night run and depending
on my payload, make the right height adjustment. Everything is copesetic.
None of the hardware interferes with the steering or falls apart. COOL
BEANS.
For those folks who just can't get enough, for about $9, you can add
a gearbox from a good hobby shop and motorize the adjuster. Woooo Hooooo!
Conclusion
With a little effort, I was able to make my own headlight height adjustment
tool. More extension can be added and I suppose I could mount the knob
anywhere on the bike. However, I'm so pleased with my current setup, I
do not want to muck with it as it works very well. I contacted Murph of
Murph's Kits (http://www.murphskits.com)
to see if he would be interested in providing a kit for those Connie owners
who lacked the means of making their own. He is working on an adapter similar
to mine, that should be more durable and may utilize welded parts. I expect
it may be easier to install by the time he gets done with it. This setup
will also fit a newer Concours. I checked it against an '01, Kerry's Connie,
just to make sure.
Parts and Contacts
Murph's Kits, http://www.murphskits.com
for a complete kit (to be released some time in the future, like maybe even in the after life).
Murph has a machine shop where he produces gadgets for the Concours.
Stuff like laser death ray guns, rocket launchers, stealth cloaking devices,
antigravity tipover stabilizers, and high speed get off ejector seats. He will
even sell you complete screw kits if you are missing a bolt.
For the Do It Yourself-ers...
Assorted hardware, see illustrations, description, and photos
1 ea. carburetor adjustment tool, length about 12" with the magnetic
hex bit socket
55250 CARBURETOR ADJUSTING TOOL
Epoxy
3 ea. #4-40 screws
1 scrap 1/16" thick plastic, with diameter to match the headlight adjuster
2 ea, 1/4 bolts 3/4" length, nuts, lock washers
2 ea, 1/2" rubber lined wire clamps
Package of 4 brackets 2" x 1/2" x 1/16"
1 ea, #2 drywall hex bit, tip ground off (powered grinding wheel works
best)
UV resistant tie wraps
Author: Harry Martin
http://HarryMartinCartoons.com/
COG #4090
CDA #0054
 I recently purchased a new headlight bulb for my '86 Concours, "The
Shadow", as a backup in case my headlight died while out on a long trip.
I decided to install the new bulb and use the old one as the spare. After
installation, I noticed that the beam was a tad off from where I wanted
it to point. Now I had to figure out how to adjust something I've never
done before. Where is it and how do I do it? After checking the big
"K" manual, I found it on the lower left side of the bulb socket.
A little round thingy with three holes in a triangular pattern. The owners
manual describes how to use a phillips screwdriver to make this vertical
adjustment. Not so easy...well, for me anyway. It took four screwdrivers
before I found one that fits in the hole and mates properly with the teeth
on the adjuster. The first time I tried to do this, I chewed up some plastic
and popped loose the metal bracket that straddles the slot.
I recently purchased a new headlight bulb for my '86 Concours, "The
Shadow", as a backup in case my headlight died while out on a long trip.
I decided to install the new bulb and use the old one as the spare. After
installation, I noticed that the beam was a tad off from where I wanted
it to point. Now I had to figure out how to adjust something I've never
done before. Where is it and how do I do it? After checking the big
"K" manual, I found it on the lower left side of the bulb socket.
A little round thingy with three holes in a triangular pattern. The owners
manual describes how to use a phillips screwdriver to make this vertical
adjustment. Not so easy...well, for me anyway. It took four screwdrivers
before I found one that fits in the hole and mates properly with the teeth
on the adjuster. The first time I tried to do this, I chewed up some plastic
and popped loose the metal bracket that straddles the slot.